Textures
Introduction
Welcome to texures section of OpenGL Tutorials. In this section, we will be learning the way to give texture to objects. We will also learn about the different texture filtering, texture wrapping and masking.
Texture Coordinates
In order to map texture to our triangle, we need to link each vertex of the triangle to which part of the texture it corresponds to. Therefore, each vertex must have texture coordinates, then only it will map the texture image to our triangle.
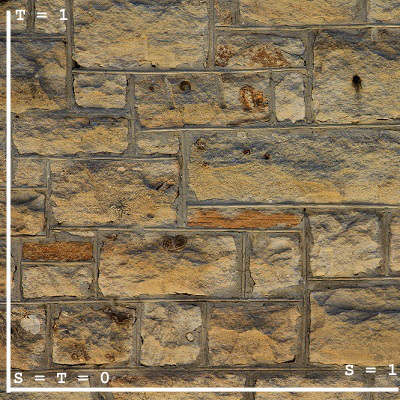
Texture coordinates range from 0 to 1 in x and y axis. When talking about textures, we usually refer x-axis as s-axis and y-axis as t-axis. At the bottom left of the texture, both X and Y equals to 0 (S = T = 0). At the rightmost of the texture, X = 1 (S = 1) and at the topmost of the texture, Y = 1 (T = 1).
The texture coordinates for our triangle with corresponding vertices is shown below -
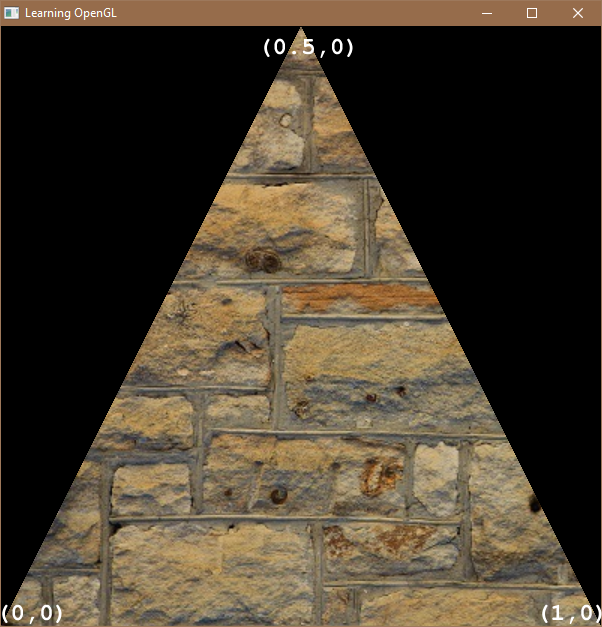
We specify 3 texture coordinates of our triangle for its 3 vertices. For the top vertex, the texture coordiante will be (0.5,1). For bottom left and bottom right, the texture coordinate will be (0,0) and (1,0).
Setting Up Texture for Our Triangle
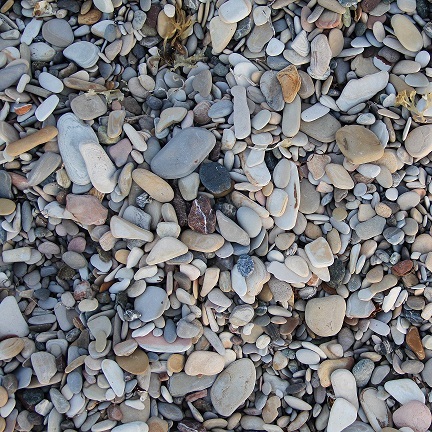
We will be using this image as texture for our triangle. We need to do some things once in SUB _GL(). For example, we have to load our texture and set its different properties. We can also put our _glViewPort() in the procedure, as it doesn’t need to be called again & again, unless the window size has changed. We have to vertically flip the image loaded in QB64. This is done as OpenGL store image data in reverse order.
...

SUB _GL ()
    STATIC glInit
    'Here we'll put our OpenGL commands!
    IF NOT glInit THEN 'This block will execute once.
        glInit = -1
        _glViewport 0, 0, _WIDTH, _HEIGHT 'here _WIDTH() and _HEIGHT() gives the width and height of our window.
        img& = _LOADIMAGE("texture_2.jpg")
        img2& = _NEWIMAGE(_WIDTH(img&), _HEIGHT(img&), 32)
        _PUTIMAGE (0,_HEIGHT(img&) - 1)-(_WIDTH(img&) - 1, 0),img&,img2&
    END IF

    ...
Textures are reference with an ID, so we have to declare a STATIC variable for it inside _GL().
...
    IF NOT glInit THEN
        glInit = -1
        _glViewport 0, 0, _WIDTH, _HEIGHT 'here _WIDTH() and _HEIGHT() gives the width and height of our window.
        img& = _LOADIMAGE("texture_2.jpg")
        img2& = _NEWIMAGE(_WIDTH(img&), _HEIGHT(img&), 32)
         _PUTIMAGE (0,_HEIGHT(img&) - 1)-(_WIDTH(img&) - 1, 0),img&,img2&

        STATIC myTex AS LONG'our textyre handle
        _glGenTextures 1, _OFFSET(myTex) 'generate our texture handle
        _glBindTexture _GL_TEXTURE_2D, myTex 'select our texture handle

...
We use _glGenTextures() to generate texture IDs. The first agruement is for number of textures to be generated which is going to store in the second array argument. We can usually pass a unsigned integer variable as its second arguement when generating only one texture ID and We need to pass this second argument with _OFFSET(). After this, we select our texture with the help of _glBindTexture(). The first argument is texture type, which is _GL_TEXTURE_2D for our image, and the second argument is for our texture ID.
Now, our next step is to give image data to our texture
...
    STATIC myTex AS LONG'our texture handle
    _glGenTextures 1, _OFFSET(myTex) 'generate our texture handle
    _glBindTexture _GL_TEXTURE_2D, myTex 'select our texture handle

    DIM m AS _MEM
    m = _MEMIMAGE(img2&) 'we will take data from our image using _MEM.

    'giving image data to our texture handle
    _glTexImage2D _GL_TEXTURE_2D, 0, _GL_RGB, _WIDTH(img&), _HEIGHT(img&), 0, _GL_BGRA_EXT, _GL_UNSIGNED_BYTE, m.OFFSET

    _MEMFREE m
...
We created a _MEM type variable ‘m’ and used _MEMIMAGE() to get a data block for our image. After this, we use _glTexImage2D() to pass our image data -
- The first argument specifies the texture target. Since our texture has
_GL_TEXTURE_2Dtype, we set it to_GL_TEXTURE_2D. We can also set it to_GL_TEXTURE_1D,_GL_TEXTURE_3D, etc. depending on our requirements. - The second argument specifies the mipmap level of texture.
- The third argument specifies the format in which OpenGL will store the image data. We will set this to
_GL_RGB. However, you can set it to_GL_RGBAif your image have some transparency. - The fourth & fifth argument specifies the width and height of our image.
- The sixth argument specifies the border of our image. It must be 0.
- The seventh argument specifies the data format of our loaded image. This must be
_GL_BGRA_EXTfor all QB64 loaded image. - The 8th argument specifies the data type of our pixel data. It usually
_GL_UNSIGNED_BYTEfor all QB64 loaded image. - The last argument is the actual image data. (
m.OFFSET)
After this, we free our image data block using _MEMFREE.
Texture Wrapping
Texture coordinates are usually between 0 and 1, but what happens when we specify above this range? The default behaviour of OpenGL is to repeat the texture. However, there are different options -
_GL_REPEAT: Repeats the texture._GL_MIRRORED_REPEAT: Similar to_GL_REPEATbut mirrors the texture with each repeat._GL_CLAMP_TO_EDGE: It clamps the coordinate between 1 and 0.
Each of this property can be set per coordinate axis (S and T (and R for 3D), just like X, Y, Z) with the help of _glTexParameteri() command. The first argument is for texture type. The second argument is the property which we are going to set and the last argument is the value for the property.
...
    _MEMFREE m
    'set our texture wrapping
    _glTexParameteri _GL_TEXTURE_2D, _GL_TEXTURE_WRAP_S, _GL_REPEAT
    _glTexParameteri _GL_TEXTURE_2D, _GL_TEXTURE_WRAP_T, _GL_REPEAT
...
Texture Filtering
OpenGL offers us some texture filtering, 2 of them are -
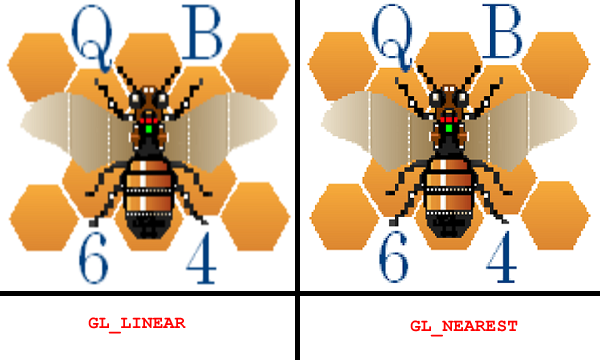
_GL_LINEAR: In this, OpenGL apply linear filtering to image and make image look smoother._GL_NEAREST: In this, OpenGL select the pixel which centers closest to texure coordinate.
The image below show us the difference between _GL_LINEAR and _GL_NEAREST on QB64 Bee.
Texture filtering too, can be set using _glTexParameteri(). Texture filtering are set for magnifying and minifying operation.
...
    'set our texture wrapping
    _glTexParameteri _GL_TEXTURE_2D, _GL_TEXTURE_WRAP_S, _GL_REPEAT
    _glTexParameteri _GL_TEXTURE_2D, _GL_TEXTURE_WRAP_T, _GL_REPEAT

    'set out texture filtering
    _glTexParameteri _GL_TEXTURE_2D, _GL_TEXTURE_MAG_FILTER, _GL_LINEAR 'for scaling up
    _glTexParameteri _GL_TEXTURE_2D, _GL_TEXTURE_MIN_FILTER, _GL_NEAREST 'for scaling down

END IF
...
Just like we have discuss in blending section, texture need also to be enable by _glEnable(). I’ve change _glClearColor() to black.
...
    END IF

    _glEnable _GL_TEXTURE_2D 'enable texture mapping

    _glClearColor 0, 0, 0, 1 'set color to solid black
    _glClear _GL_COLOR_BUFFER_BIT
...
Now, we select our texture with the help of _glBindTexture(). After that, we specify texture coordinate with the help of _glTexCoord2f(). It has 2 argument, which just take value of S and T.
...
    _glBindTexture _GL_TEXTURE_2D, myTex
    _glBegin _GL_TRIANGLES

    _glTexCoord2f 0.5, 1
    _glVertex2f 0, 1

    _glTexCoord2f 0, 0
    _glVertex2f -1, -1

    _glTexCoord2f 1, 0
    _glVertex2f 1, -1
    _glEnd
...
The full source code is here. Run the program and you will have the following output -
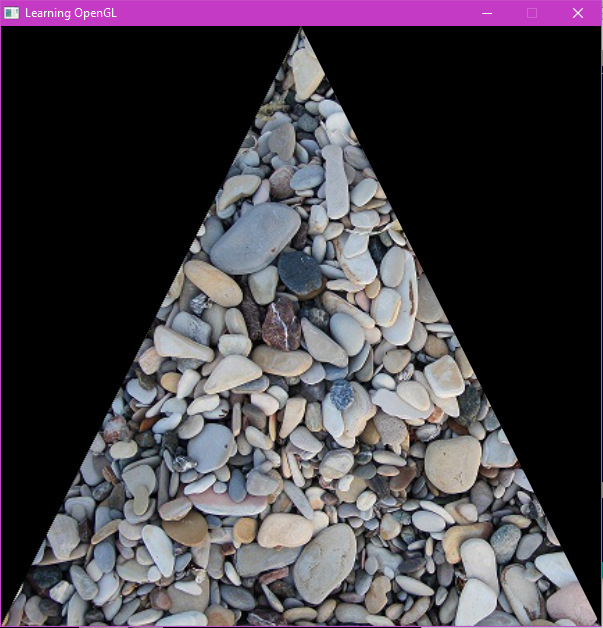
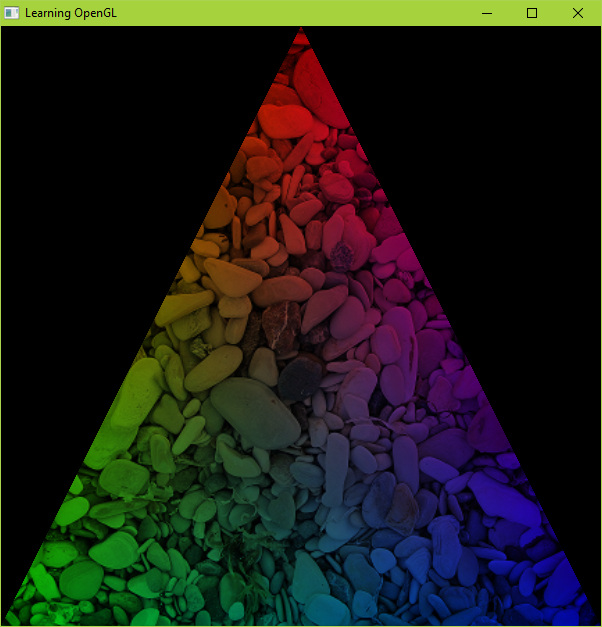
Congrats! You learned about textures! You are also allowed to set color along with texture coordinates!
...
    _glBegin _GL_TRIANGLES

    _glColor3f 1, 0, 0
    _glTexCoord2f 0.5, 1
    _glVertex2f 0, 1

    _glColor3f 0, 1, 0
    _glTexCoord2f 0, 0
    _glVertex2f -1, -1

    _glColor3f 0, 0, 1
    _glTexCoord2f 1, 0
    _glVertex2f 1, -1

    _glEnd
...
This will have the following output -
Masking
We can combine our knowledge of blending and textures to mask on pictures and get some awesome effect. For this, we need two images. The one will be mask, which will define which pixel to keep and remove. We will be using this mask.
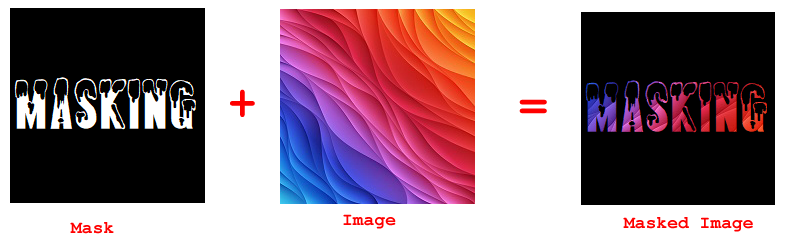
The above effect can be easily achieved by drawing the image first, then calling _glBlendFunc _GL_ZERO, _GL_SRC_COLOR and then drawing our mask. Here’s the code -
_TITLE "Learning OpenGL" 'giving title to your window
SCREEN _NEWIMAGE(600, 600, 32) 'creating a window of 600x600

'This is our main loop
DO
    _LIMIT 40 'Adding this will prevent high cpu usage.
LOOP

SUB _GL ()
    STATIC glInit
    'Here we'll put our OpenGL commands!
    IF NOT glInit THEN
        glInit = -1
        _glViewport 0, 0, _WIDTH, _HEIGHT 'here _WIDTH() and _HEIGHT() gives the width and height of our window.
        img& = _LOADIMAGE("texture_2.jpg")
        img2& = _NEWIMAGE(_WIDTH(img&), _HEIGHT(img&), 32)
        _PUTIMAGE (0, _HEIGHT(img&))-(_WIDTH(img&), 0), img&, img2&

        STATIC myTex AS LONG, myMask AS LONG 'our texture handle
        _glGenTextures 1, _OFFSET(myTex) 'generate our texture handle
        _glBindTexture _GL_TEXTURE_2D, myTex 'select our texture handle

        DIM m AS _MEM
        m = _MEMIMAGE(img2&) 'we will take data from our image using _MEM

        'giving image data to our texture handle
        _glTexImage2D _GL_TEXTURE_2D, 0, _GL_RGB, _WIDTH(img&), _HEIGHT(img&), 0, _GL_BGRA_EXT, _GL_UNSIGNED_BYTE, m.OFFSET

        _MEMFREE m
        _FREEIMAGE img&
        _FREEIMAGE img2&
        'set out texture filtering
        _glTexParameteri _GL_TEXTURE_2D, _GL_TEXTURE_MAG_FILTER, _GL_LINEAR 'for scaling up
        _glTexParameteri _GL_TEXTURE_2D, _GL_TEXTURE_MIN_FILTER, _GL_NEAREST 'for scaling down

        msk& = _LOADIMAGE("mask.png")
        img2& = _NEWIMAGE(_WIDTH(msk&), _HEIGHT(msk&), 32)
        _PUTIMAGE (0, _HEIGHT)-(_WIDTH, 0), msk&, img2&

        _glGenTextures 1, _OFFSET(myMask)

        _glBindTexture _GL_TEXTURE_2D, myMask 'select our texture handle

        m = _MEMIMAGE(img2&) 'we will take data from our image using _MEM

        'giving image data to our texture handle
        _glTexImage2D _GL_TEXTURE_2D, 0, _GL_RGB, _WIDTH(msk&), _HEIGHT(msk&), 0, _GL_BGRA_EXT, _GL_UNSIGNED_BYTE, m.OFFSET

        _MEMFREE m
        _FREEIMAGE msk&
        _FREEIMAGE img2&

        'set out texture filtering
        _glTexParameteri _GL_TEXTURE_2D, _GL_TEXTURE_MAG_FILTER, _GL_LINEAR 'for scaling up
        _glTexParameteri _GL_TEXTURE_2D, _GL_TEXTURE_MIN_FILTER, _GL_NEAREST 'for scaling down


    END IF

    _glEnable _GL_TEXTURE_2D 'enable texture mapping
    _glEnable _GL_BLEND 'enable blending

    _glClearColor 0, 0, 0, 1 'set color to solid black
    _glClear _GL_COLOR_BUFFER_BIT


    _glBindTexture _GL_TEXTURE_2D, myTex
    _glBegin _GL_QUADS
    _glTexCoord2f 0, 1
    _glVertex2f -1, 1
    _glTexCoord2f 1, 1
    _glVertex2f 1, 1
    _glTexCoord2f 1, 0
    _glVertex2f 1, -1
    _glTexCoord2f 0, 0
    _glVertex2f -1, -1
    _glEnd

    _glBlendFunc _GL_ZERO, _GL_SRC_COLOR

    _glBindTexture _GL_TEXTURE_2D, myMask
    _glBegin _GL_QUADS
    _glTexCoord2f 0, 1
    _glVertex2f -1, 1
    _glTexCoord2f 1, 1
    _glVertex2f 1, 1
    _glTexCoord2f 1, 0
    _glVertex2f 1, -1
    _glTexCoord2f 0, 0
    _glVertex2f -1, -1
    _glEnd


    _glFlush
END SUB
The above code has the following output -
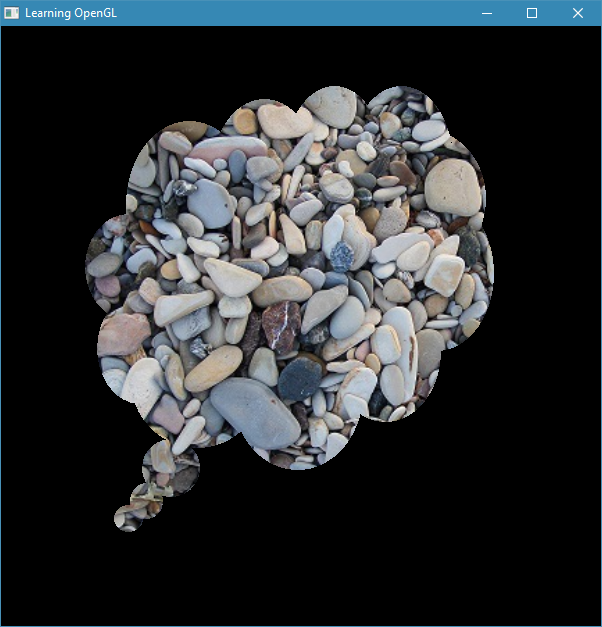
Of course, if we had used _glBlendFunc _GL_DST_COLOR, _GL_ZERO in our masking code, the result would have been same (Can you find out, why?).
This section now ends here. Go through the exercises and solve them.
Keywords You have learn about -
Exercises
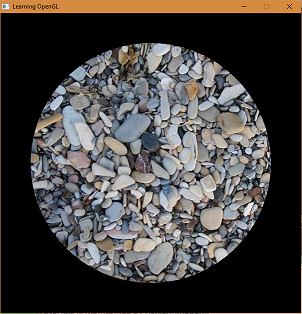
- Try to get the following output without using masking technique.

- Try to get the following output without using masking technique.
- Try to get following output using masking technique.
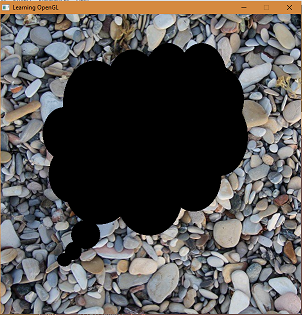
- Try to get the following output using masking technique.
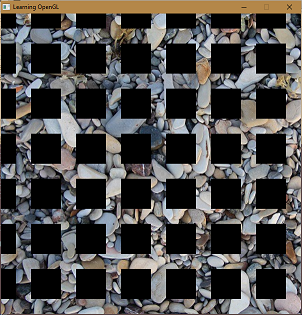
- Try to do question 1 and 2 using masking technique.